Wednesday, August 31, 2011

Shaker Duck and The Free Bride and Groom File


Hi Everyone,

I hope and pray you are all OK after Irene.

I was away in Pennsylvania, US last week.  We stayed on a farm.  
It was a lot of fun. I've never seen a farm so up close and personal.  We really enjoyed the fresh milk, eggs, shortcake, yogurt and all.
I would recommend it for kids they had a ball.
We came back to Irene with a bit of water in our basement but not bad 
compared with those around us.
Praise God we came out pretty good.
That's why it's taken a while to post.
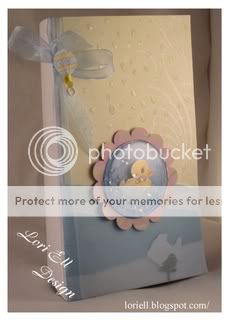
I made this card for my Hobby Lobby class as per a request.
I started with white card stock. glued ripped pieces of blue vellum to bottom. 
I ran the greenish paper through the embosser with a Fiskar raindrops plate and then put triple thick on the drops.
I dry embossed the duck with white and colored in with marker.
The window of the shaker is a button kit that I found at walmart.  It's acrylic and comes with 4 in package.
Inside are glass beads from Michael's
I used the same vellum inside the window.  The fish is a Cricut cartridge (Animal Kingdom) and a punch for the underwater plant.  Put on a bow and embellishment on top of that.
The scalloped frame is from SVG Cuts.

THANKS FOR LOOKING.  ENJOY

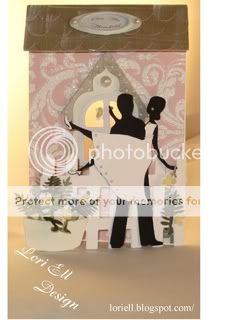
Just cut it out in black for the background and white for dress and shoes


Monday, August 15, 2011

Over The Threshold

Hi There!

I made this wedding card using my SCAL program with the "Peony Cottage" collection from  SVG Cuts.
It's from the "Peony Street Stand-Up Card" file.
The Bride and Groom file is mine if you would like it 
just let me know in the comment section.
The background paper on the house is "me & my big ideas"
The ferns are a McGill Punch.  The flowers are a Martha Stewart punch.  For the middle of the flower I used one of the same size flowers punched out in yellow and just bent the edges toward each other. The embellishment on the roof is from Stampin Up.
The saying "Over the Threshold" is made on my computer
with Broderbunds "The Print Shop" (I love that program)
I added pearls to the window, dress, and word window.
Finally I gave her a rock on her finger.

Thanks for looking,
ENJOY,  AND I LOVE HEARING FROM YOU.


Wednesday, August 10, 2011

Gift Tags Gift

Hello

I'm a bit late with my blog this week.  I had my Grandson and started as a Class Instructor at Hobby Lobby this week.
Pray for Me!
I made these gift tags as a little gift for a couple of co-workers.
You could use the tags for a wedding, bridal shower gifts, or anything really.
I put them in a little bird cage and wrapped in cellophane and it makes a great little gift for teachers, friends, co-workers.
They really loved them.
I used paper from the Hobby Lobby paper bins for the background.
I created the white flowers from an SVG Cuts 3d flower file.
The middles and the peach flowers I purchased at a yard sale. I sure do wish I had purchased more.  (I always do that)
I used white card stock and you can't see in the photo, but used some glitter around the yellow middle for some sparkle.
I used a pen to get the bends in the flower.  I used an ink pad to get the shading on the leaves of the white flower.  I used a punch for the leaves on the peach flower.  These are easy peasy and a great little gift.
THANKS FOR LOOKING AND ENJOY! 
I LOVE TO HEAR FROM YOU
Below is the file from previous posts.
Baby Girl Top SVG              Hot Air Balloon SVG            Bear SVG

Monday, August 1, 2011

Hello!
Hope this Monday finds you all well.
I made this card for my Niece who just had a baby.
I love making baby girl cards.  It comes so easy to me.
I started with vanilla SU paper, layered light pink textured paper from Hobby Lobby.  The dress:  I cut the base with the pink hounds tooth paper then cut just the top part with white card stock which I embossed with swiss dots.  I embellished the dress with pearls, a flower from the dollar store, ribbon, and an upside down mini hanger without the hook on top (you can even use broken embellishments :)
I printed her name (my Granddaughter's namesake:) and birth date on plain paper and stamped with a SU stamp that goes with that metal frame.  I added a ribbon and a button from Oriental Trading Co.  The white dots around the metal frame are rub ons.

ENJOY AND I LOVE TO HEAR FROM YOU.

FOR THE FREE SVG FILE OF DRESS LEAVE COMMENT BELOW AND I WILL POST NEXT WEEK.

Monday, July 25, 2011

Fly Away Bear Card

I had to try out my new Peachy Keen Stamps.
How cute are they!
I painted the background with water and ink onto watercolor paper and painted the clouds on top with acrylic paint. I painted the bear with acrylic paint on regular card stock.  I made it pink at first but didn't like the way it looked so just painted over top.  The face is from PK.  The paws and belly are flower soft.  The bear and balloon are my file.  I put foam tape under his belly, snout, arms, legs, and balloon for dimension.  I drew some whiskers and chalked his cheeks pink. 
I attached string to his arm and the balloon. 
I stamped a PK face on the balloon. I chalked the cheeks and colored the lips with pencil.

ENJOY!!  I LOVE TO HEAR FROM YOU!!

If you would like the free files just leave me comments below and let me know.  
I will add the files to next weeks post if there is interest.

Tuesday, July 19, 2011

The Fifties

Hi Crafters!

I had to make so many cards for the family this month I had to make this card for my two brothers, who were born the same day two years apart, (weird right?) quickly.
I just got my new Peachy Keen stamps which are so cute.
I used one of the PK stamps inside the 45 record.
I inked the lips red and chalked the cheeks
I used triple thick on the outside layer of the record
which is cut in black.
I made the bottom layer white. I made the mid layer flat black.
You should make that layer whatever color you want
the record label.  I hand wrote all the lettering for time sake.
I cut the car out of an ad.
I added a ribbon and that was about it.

If you would like the file for the record just leave me a comment below.
Thanks for looking and I LOVE TO HEAR FROM YOU!!

Monday, July 11, 2011

Gumball Machine

Hi Everyone!!

I've posted the svg's for the sweet shop down below as "Paper Dreams" blogger requested. ENJOY!  The other files are from SVG CUTS "Moonlight Garden Party" and "An Afternoon At Auntie Elaine's" also Cricut's "Paisley" cart.

I made this gumball machine for my Grandson 
Matthew's Birthday
coming up.  I used a file from
SVG CUTS "An Afternoon At Auntie Elaine's"
I cut the bottom piece out in gray. The top and bottom are cut
out in red with white highlights and triple thick on top.
I cut the gumballs out with a punch and added triple thick.
I got the coin from a place in Arizona.  Isn't it cute.
I put a piece of clear plastic. on top for the glass.
The skateboard is from my dental office treasure chest.
I put my own paper on top and took off two wheels and glued it down.  I cut the middle piece of the coin part out of silver paper.  The word Matt is from Sizzlits "Classic" lettering die cut set.

I LOVE TO HEAR FROM YOU AND THANKS FOR LOOKING!!

Click below for sweet shop files.
Awning
Umbrella and Storefront

Tuesday, July 5, 2011

Asian Birthday Card

Happy Monday Everyone!

I made this card for my Mom's Birthday.
She and I both love Asian design.
The bird cage is from Cricut Pagoda cartridge.
The birds are from Home Decor cartridge. I'm a bit obsessed with the paper flowers lately.  The embellishment is a chop stick cut to size.  The embellishments on the sides of the Happy Birthday are a Sizzix die cut.  You can't tell from the picture but I glued the cage down so that it is slightly rounded and raised so it looks circular.
The Happy Birthday is from Stampin Up-Elegant Greeting.
ENJOY!!

Monday, June 27, 2011

Bird House Gift Box

Hi There!

I made this little gift box for a girl at our Church who is moving into her first apt.
I will probably add a tag if time allows, that says Home Tweet Home.
The birdie is just too precious isn't it?
The file is from SVG CUTS.
There is a how to video on their site.  
I chalked the cheeks and wings of the bird.The eyes-I took those packages of eyes
and removed the little black ball and glued them on.
I embossed the top front piece with a cuttlebug folder.
I put a trim piece on the face of the roof with a sizzix die cut.
I embossed the roof trim with a cuttlebug folder also.
The flowers are from Michael's dollar bin.  The middles I bought at a yard sale.
I sprayed it with a pearl spray.. 
I haven't decided which way I like the top yet.
What do you guys think?
I had a great time making this one it was much simpler than the house. 
I will be trying that house again though. 
I can't let it beat me. lol


Thursday, June 23, 2011

Hi All!

Rain rain go away here in NY.
Hope you're having better weather than we are.
Oh well, I don't have to feel guilty about crafting today at least.
This is an acrylic holder that you can get from any craft store.
I always love this rubber stamping technique as it is so easy yet comes out so pretty every time.  All you do is dry emboss a background word stamp with white emboss on white watercolor paper then stamp your image over top.  I wet the ink and add a few different colors on top of each other so it looks like an actual watercolor painting.  You can fleck some wet ink for an artistic effect too.  The paper underneath just slides in. The pen is a Pentel pen so you can open it and put whatever paper you'd like inside. I used a small piece of clear velcro to hold the pen on.
Embellish as you wish and voila a beautiful sticky note holder.
This technique is great for cards.

Thursday, June 16, 2011

Little House Gift Box

Hi There,
I made this house just because I thought it was so cute.
I REALLY struggled with this though and still don't know if I like it.  I think I would make the house itself dark next time and the windows and trim light.  Anywho, Click here SVG CUTS for the file.  
They give you all the instructions along with a video.

Have a Great Week and I Love To Hear From You All.
Thanks For Looking.

Tuesday, June 7, 2011

Baby Carriage Gift Card Holder

Hi Everyone
I hope your week is going well so far.
I made this for my Niece's baby shower this weekend.  I embossed the hood with swiss dots.I chalked the base of the wheels green.  I added pearls to the wheels on top of brads.  I put ribbon on the hood flap and on top. I printed the baby on card stock and, cut it out, and glued it into the stuffing. I added stability to the wheels by putting a heavy piece of card stock as "axle's"
This file is from SVG CUTS it's called Bundle of Joy.  It's a great site if you haven't checked it out yet.  The baby is from Peggy's Vintage on a site called Etsy.
I think that's it.  It took me a lot longer to make than explain. lol

Thanks for Looking and I LOVE TO HEAR FROM YOU!!

Click Here for the Jefferson Memorial from last week's post  Jefferson Memorial


Monday, May 30, 2011

Memorial Day in U.S. ,Cherry Blossoms & Japanese History


I took artistic liberty ( no pun intended,really) by putting cherries on my trees for this project even though there are no cherries on the Japanese Ornamental trees in D C. I've posted some interesting facts about cherry trees & U.S. history.
Maybe we should pay it forward & give the Japanese some trees as a gift to help them rebuild after the tsunami:

In 1912, the people of Japan sent 3,020 cherry trees to the United States as a gift of friendship. First Lady Taft and the Viscountess Chinda, wife of the Japanese Ambassador, planted the first two cherry trees on the northern bank of the Tidal Basin. These two original trees are still standing today near the John Paul Jones statue at the south end of 17th Street. Workmen planted the remainder of the trees around the Tidal Basin and East Potomac Park.

George Washington and the Cherry Tree Story
When George was about six years old (1738 , he was made the wealthy master of a hatchet of which, like most little boys, he was extremely fond. He went about chopping everything that came his way.
One day, as he wandered about the garden amusing himself by hacking his mother's pea sticks, he found a beautiful, young English cherry tree, of which his father was most proud. He tried the edge of his hatchet on the trunk of the tree and barked it so that it died.
Some time after this, his father discovered what had happened to his favorite tree. He came into the house in great anger, and demanded to know who the mischievous person was who had cut away the bark. Nobody could tell him anything about it.
Just then George, with his little hatchet, came into the room.
"George,'' said his father, "do you know who has killed my beautiful little cherry tree yonder in the garden? I would not have taken five guineas for it!''
This was a hard question to answer, and for a moment George was staggered by it, but quickly recovering himself he cried:
"I cannot tell a lie, father, you know I cannot tell a lie! I did cut it with my little hatchet.''
The anger died out of his father's face, and taking the boy tenderly in his arms, he said:
"My son, that you should not be afraid to tell the truth is more to me than a thousand trees! Yes - though they were blossomed with silver and had leaves of the purest gold!''

I cheated a bit on this project.  I printed a picture of the Jefferson Memorial, I cut out the building on SCAL with a file I created.  I put foam tape on the dome and the steps to give it dimension.  I cut out branches from one of my files. I glued Michael's dollar bin flowers on top of which I glued pink Flower Soft to create centers.  I used a free file called Sweet Treats cherries from SVG Cuts to cut out the cherries and stems.  I put Triple Thick on the cherries and let dry over night. The leaves are my file. I cut two size leaves in two shades. The bushes have a pastel green Flower Soft with darker green card stock as the base.
I think that's it. 

If you would like the SVG file for the Jefferson  Memorial let me know in the comment section below.
The branches are in this post as well as the files from last week.

THANKS FOR LOOKING AND I ENJOY HEARING FROM YOU!

Below are the SVG's  for last weeks post.
     Leafy Plant Vertical SVG       Store Front with Awning and Sign Post SVG 
Branch SVG

Tuesday, May 24, 2011

Sweet Shop

I made this for my Daughter-In-Law's upcoming Birthday.
I got a bit carried away with the size lol.
I started with an SVG CUTS 
"Moonlight Garden Party"
I just thought the chairs were too cute. 
Hard to believe what I'm inspired by isn't it?  lol
The background is a textured light pink from the bin at Hobby Lobby.
The branch is my file.  The flowers on the branch are from Michael's dollar bin embellished with pearls.
The awning is my file,scored on the two ends. The building is just a rectangle with a rectangle window.
I put about 1/4" of foam tape on the back of the building to raise it up enough for the bakery shelf
The shelf I scored with Scor Pal. The treats are from "An Afternoon at Auntie Elaine's" by SVG CUTS.
layered with triple thick on the stand of the cake. The sundae's are from a free file from SVG CUTS
called "Cheryl's Sweet Treats", I have triple thick on the glasses, the ice cream is liquid applique & glitter, the spoons are from "An Afternoon at Auntie Elaine's" take out the swirl on the spoon for such a small cut.
The table is the cake stand manipulated in SCAL.  The wrought iron on the table is a sizzix die. 
The sign is a cuttlebug embossing plus cutting die with a embellishment from the dollar bin @ Michael's
  The building is textured with a Fiskars texture plate.
The umbrella pole is a brush from my dental job. (perks-ha ha).  The umbrella is my file with an extra horizontal fold to fit on the page without sticking out too far.
The bird is from a free file from "Cheryl's Sweet Treats" which I drew in the beak and eye and chalked.
The plant on the side of the building is my file.  
The boots that I used as a planter
are from Cricut "Paisley" cart.
The plants inside boots and on table are a punch which is one I use often.

If you would like the files for the awning, the plant or the branch just let me know by commenting in the tab below this post and I will add them next week.

Thanks for Looking!!!

I LOVE TO HEAR FROM YOU!!


Monday, May 16, 2011

Cindy Loo Cartridge


This is a fairly easy card to make.  
I cut the deer and tree out of plain white card stock.
The background is SU Sage Shadow. The water is Su Bashful Blue. 
The eye is black with triple thick on it. The ears and hoofs are pink Sulyn glitter,
its kind of like a glittery flower soft. 
The tree is embellished with blue rhinestones. 
I chalked the water, tree, and deer. 
I drew in the inner ears, chest and the speckles on his back 
before adding snow to the white parts. 
The leaves are a fern punch.  The flowers are also a punch

ENJOY!! I LOVE TO HEAR FROM YOU!!

Monday, May 9, 2011

The Butterfly Project & Pumpkin Carriage for Embossing Folder SVG


I thought it appropriate to revisit this project during 
Holocaust rememberance week.
The Houston Holocaust Museum 
is doing a project for the 
1,500,000
children that died in the Holocaust.  
They are having people send in enough butterflies 
to have one represent each child. 
They will display in 2013.
Here is the link for the details The Butterfly Project
I got this link from Dan @ My Crafty Life (Really interesting blog)

I started with black card stock for for the girl then used 
water color paper to cut out
top layers.  I chalked the skin tone and used 
colored pencils for the lips & outlines.
I used triple thick to form a tear coming out of her eye.
I used a pink vellum to line the wings and cut out a star of David for each wing.
I think I powder embossed the stars and then inked them.
I cut the skirt out with "Me & My Big Ideas" card stock tablet.
I embellished with pearls and rhinestones.
Tied a ribbon on back so it could hang.

If you would like the file let me know in the comment section.
ENJOY! I LOVE TO HEAR FROM YOU

Here is the link to the pumpkin carriage for embossing folder svg
Pumpkin Carriage for Embossing Folder

Tuesday, May 3, 2011

In Honor of William & Kate Princess Carriage and First Holy Communion Dress File

I posted this to honor William & Kate!  What a cute couple aren't they?
I made this for my Granddaughter Olivia. I created the SVG file for the Cuttlebug embossing folder.
I created a square bottom with scor pal to connect the two sides.  I scored a long narrow piece to attach to the bottom and the two pumpkin sides.  I put Diamond Dust from AC Moore on the horses and underneath their feet.  I put a piece of black where the upper half of the door should be and attached Olivia's picture to that.The parts and horses are from the Happily Ever After Cartridge.  The pink diamond is from Hobby Lobby.  I embellished carriage and Olivia's crown with pearls and rhinestones.  I used pink pearl dust and a swirl rubber stamp on the piece that's between the pumpkins.  I attached the horses with ribbon and put a bow on the back of the carriage. 
I attached everything to a big oval from the shapes library in SCAL.
 I cut the letters out from SCAL
If you would like the file for the pumpkin carriage let me know in the comment section below and I will post it next week.  I created it to fit around the embossing folder.
ENJOY!  I LOVE HEARING FROM YOU!!

Here is the dress file from last weeks post First Holy Communion 
 I also use this for a Christening dress just elongate it and 
shorten the length to make it look like it is for an older girl.

Here's the file for  Pumpkin Carriage and Horses Files


Tuesday, April 26, 2011

Shadowbox for First Holy Communion and SVG for Glamour Puss Kitty

                                                           Hi Everyone,
                                                       I hope everyone had a great Easter.
Easter is such a great holiday because He Is Risen thus we are saved!!!
I had a great time but always glad when holidays are over too.

I embellished this First Holy Communion Invitation for a friend.  The background paper is from the bin @ Hobby Lobby.  The bow I made with white satin ribbon. The corners are made from a Sizzix die.  The lace overlay is made from a Martha Stewart edge punch.  The swirl is made from a Cricut Solutions Home Accents. I just have it sitting there as I'm not sure if I want it there or not.  It gives the shadowbox dimension though.  I will pull out the swirl a bit more when I finish.  The dress is my SVG which I will post next week if you leave comments below letting me know there is interest.  I used tulle for the bottom of the dress, ribbon around the bodice, the flower is from ribbon, and the edging on the sleeves are a cutout piece from the overlay (Martha Stewart punch).  I blocked out the personal info for privacy purposes.
Thanks for Looking!!!!

Here is the link for the Glamour Puss Kitty Glamour Puss Kitty

Monday, April 18, 2011

Sweet 16 Card

I made this card for my Niece's Sweet 16 this weekend.  Whew. When you have a big family it seems like there's a party every other weekend.  The background is cameo coral card stock from Stampin Up. 
I used Tags, Bags, Boxes and More cartridge for the little purse.
The animal print is her party theme.  I picked the animal print paper from the Hobby Lobby paper bin. 
The corners are Provo Craft die cuts.  The #16 is Sizzix Funky Brush die cut.  
I punched an oval and hand inked the silver and dots.
The eyes are blue rhinestones mounted on white. The nose is
pink paper with "triple thick" on it.  The collar is pearls
and a clear rhinestone.
The kitty and words "glamour puss" are an svg which I will post next week 
if there are enough comments to let me know the interest level.
Thanks for Looking.  Have a Blessed week!

  Here's the Easter Basket Bunny SVG File. I omitted it last week.

Tuesday, April 12, 2011

My Husband's 50th

This is my husband's 50th Birthday card which is today.  Happy Birthday Babe!!
Guess what his passion is.   I'll give you three guesses the first two don't count.
I followed the step card instructions for the base.  The mountains are a sizzix die. The tree is an SVG file which I'll leave at the end.  I used liquid applique for the snow peaks.  I drew the road first while it was flat and then glued candlescape sand from Pier 1 Imports onto it (you can get it at any hobby shop).I then painted the road and added white lines with paint. The grass by the sign is a sizzix die cut.
The motorcycle is from Toys R Us.  I had to buy one that was attached to a trailer to get it small enough.
I gave the truck and trailer to my Grandson. (He was none the wiser)
I  chalked the background with sky and sunset colors along with the ground and mountains.
The little guy is from my railroad people.  You can get them at a hobby shop that sells train stuff.
The sign is from Cricut's Going Places.
ENJOY!!
I LOVE TO HEAR FROM YOU!!


Tuesday, April 5, 2011

Easter Basket for My Granddaughter


I made these baskets for my Granddaughter Olivia.  Good thing I started Easter early whew!!  I made the eyes by punching out three ovals (two black, one blue) I glued them together and coated with "Triple Thick". Once they dried, I let them dry overnight, I penned white highlight in a starish shape.  I pencilled in the eyelashes first, when I was happy with the way they looked I went over them with marker. I chalked the cheeks and ears with pink.
The nose is just a rounded triangle with triple thick and highlighted. The front paws are ovals ( I have the files
if there is enough interest I will leave the files next week) I drew the paws in with pencil than went over them with pink marker. The back paws I have the file for. I just drew in the face same thing pencil than pink marker. The ribbon was a sale at Hobby Lobby.  I hot glued everything onto the basket. The whiskers are white wire.  I think I put white punched out dots over top by the nose.  The mini bunny tail is a pom pom, the big bunny is a cotton ball. The mini bunny is a box that a pen came in from the dollar bin at Michael's. (Not really a dollar anymore) I think that's everything.  If not let me know.

I LOVE TO HEAR FROM YOU!!

I will post the SVG's for the face, ears, back and paws next week as long as there is enough interest.
Leave me a comment in the "comment section to let me know if you'd like the files"

Thursday, March 31, 2011

Easter Basket for My Grandson


Hi Everyone,
This is my Grandson's Easter Basket.  I used Cricut's Animal Kingdom for the face and tail.  I covered the spot where the eyes go with hard plastic so it wouldn't cut them out and used eyes from the craft store.  The eyelashes are from tips that I use in the dental office I work in.  The whiskers are white wire. The tushy and tail is in SVG but, you can just draw three ovals.  I chalked to create the delineation for the legs.  I had to make the tail huge in design studio. I created my own paws (also just ovals). I hot glued it to the basket.
If you want the SVG for the paws and tushy just let me know in the comment section below. 

I'm also adding the svg for the bunny from last weeks post as there was a lot of interest.  
In answer to the question"What paper did I use for the bunny card"?
I used white cardstock from Sam's club (like $7.00 US dollars for 250 sheets)
Bashful Blue Stampin Up cardstock the wheelbarrow was an older SU designer paper
The grass I used from packaging from I don't even know what.
Thanks for the lovely comments!
I LOVE to hear from you all!!

Bunny SVG

Monday, March 21, 2011

Easter Card for a Girl


This is my Granddaughter Olivia's Easter Card.  If you would like details let me know in the comment section at the bottom. I will also add the SVG file. Thanks for looking.  It's snowing hear in NY so Easter seems elusive right now. lol

ENJOY! I LOVE to hear from you!!

Here's the file for the bunny Bunny SVG


Monday, March 14, 2011

Cute Little House Picture Frame

These are my beautiful Grandchildren,
Olivia and Matthew.
I made this frame from  SVG CUTS called Strawberry Lane. This can be put into a shadowbox frame but I chose to put a magnet on the back and put it on my fridge. This is the first time I've purchased their files but, I will definitely be buying from them again. The files are very organized and you get  a bunch of cuts.

I can't give you the files for the house as they are copyrighted.

If you would like to know the details on either project just let me know.  ENJOY! I Love to hear from you!

 This is an Easter card for Matthew.
Click Here for SVG for bear 
ENJOY!  I Love to hear from you! 


Monday, March 7, 2011

Spring Time Card


Happy Monday Everyone!
I guess I'm getting anxious for Spring!
This is my husband's Easter Card.  I tried not to make it feminine.How did I do?  I found this stuff at Hobby Lobby called Triple Thick brush on gloss glaze for the clock pole.  It's similar to Stampin Up's Crystal Effects but much less expensive.  Now I have to put it in something to help me keep the bubbles out of it.The post is from the Cricut Christmas Noel cart. The clock is an SVG file.  The clock face I printed from the web and used S.U. markers.  The bird is a Martha Stewart punch. The flowers and stems are punches and the centers are pearls.  The words are from SCAL. The silver paper for clock is from SU.  The close up picture is the true color. I normally use pastels but liked the way these bright colors came out.  The blue is from Hobby Lobby single sheet section.
ENJOY!  I LOVE TO HEAR FROM YOU ALL!!
Click Here for SVG file Clock Hanging Pretty

Tuesday, March 1, 2011

Favors for First Holy Communion


These are favors I'm doing for a client for a
First Holy Communion.
I used  Martha Stewart-Double Arch Large 
Punch Around The Page Set for the handle.  
Cricut-Tags, Bags, Boxes and More  
Popcorn Box set at 6".  
The crosses are Michaels 8 pieces 
"Jewelry Essential Findings" Charms 
found in the Jewelry Aisle.
White satin ribbon.  White card stock.
I punched one side of the paper for the handle then 
I measured by eye, leaving space for the ribbon 
with wriggle room for imperfections and then measured
the amount I would need for the punch design 
and punched the other side.  
It is put together with terrifically tacky tape so it's strong enough for candy.

Thanks for looking.  I LOVE to hear from you and would enjoy seeing your projects.

Thursday, February 24, 2011

Tuesday, February 15, 2011

Flower Cart


Here is a screen capture for the instructions for the body.
I made the UPS truck into an ad for my husband.  I put a pic of him driving it.
The SCUT file I don't have in SVG but I think someone at SCAL can help you turn them into
an SVG.  They're awesome on SCAL forum.
If you have any questions I'll try to answer them.

This is my rendition of Scor Pals flower cart. If you haven't checked them out yet you don't know what you're missing.  Scor Pal Link  I've also created the SVG's for the shapes. Some are SCUT files.
If you'd like them let me know in the comment section.
If there is enough interest I'll post the files.
I LOVE to hear from you. TFL